Table columns
Learn how to navigate columns in your Clay table.
Column data types
There are a data types you can specify for your column. Here’s a high level overview of each one:
- Text: Accepts text inputs. You can use this for text fields, summaries, or descriptions
- URL: Takes in links and will open the link if you click on the cell.
- Checkbox: A true/false field that displays a checkbox. Ideal for conditional runs.
- Select: Select from a list of predefined tags. This is useful for categorizing your contacts and companies.
- Number: Allows numerical values to be entered, ideal for ISO time measurements, lead scores, or revenue measurements.
- Date: Accepts a date and time range.
- Currency: Express your values in currency amounts.
- Assigned To: Tag anyone in your Clay workspace.
- Email: Accepts any email address input.
- Image from URL: Upload image URLs for easy retrieval.
Add columns
You can add a new column to your table in a few ways:
- Scroll to the right of your table and select
Add column. - Open the dropdown menu for an existing column and choose
Insert rightorInsert leftto access the column creation dropdown. - In the column creation dropdown, you can either:
- Specify the data type for your new column (e.g., Text, Number, Date).
- Perform advanced actions, such as:
- Use AI for AI data processing or research
- Select Message drafting, Enrichment waterfall, or Formula for specific calculations or actions.
- Merge columns to combine data from multiple columns.
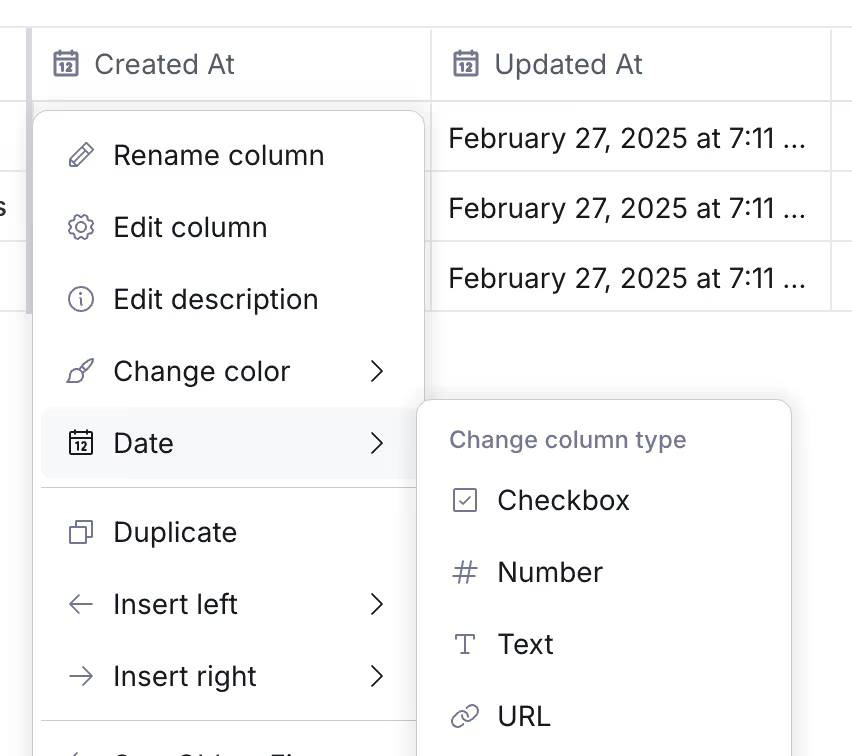
Switch column data types
You can switch the data type of your column within your table. To do this:
- Click on the column title.
- Hover over the current data type to see the dropdown of other options.
- Select your new input type.

Column input types
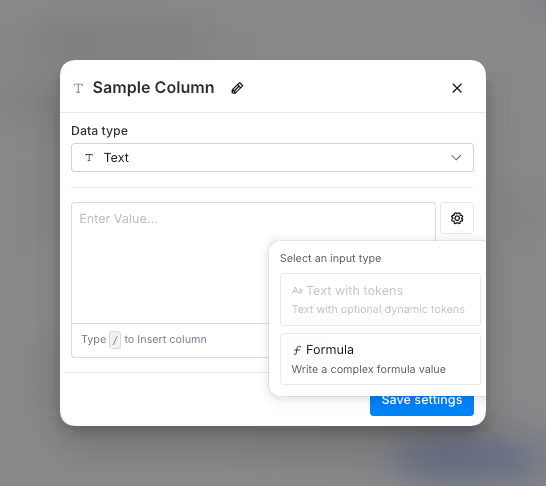
There are two types of input formats available for columns:
- Text with tokens
- Formulas
By default, columns are set to the Text with tokens input format.

Switch column input types
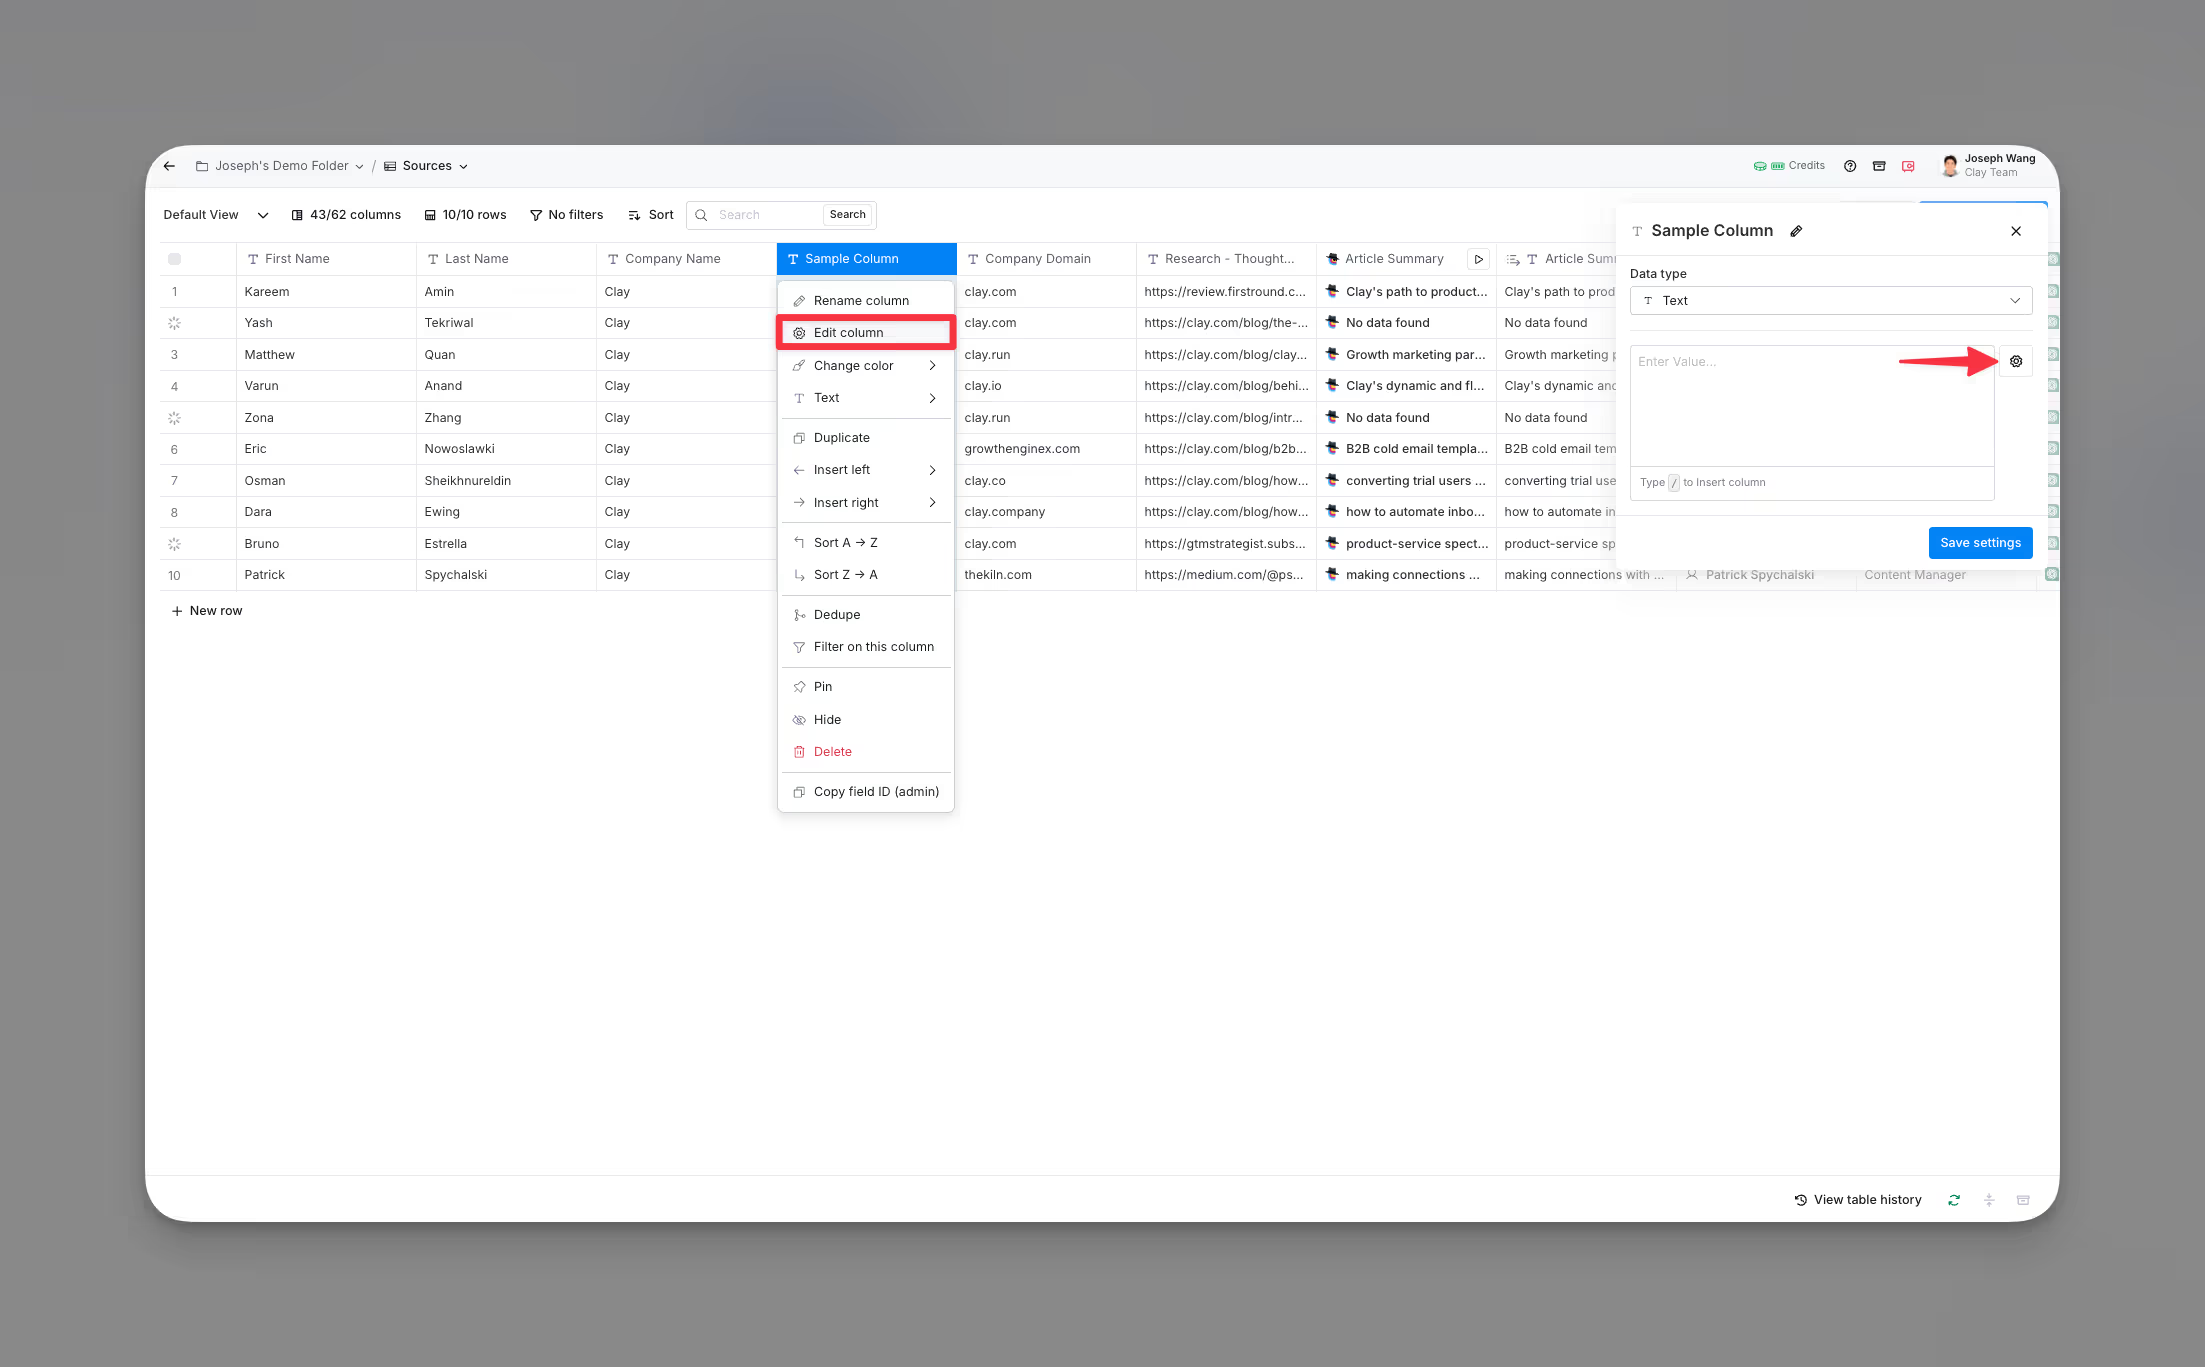
You can switch the data type of your column within your table. To do this:
- Click on the header of the column you want to edit to access the dropdown menu.
- Select
Edit columnfrom the dropdown. - Click on the gear icon and select your new input type.
- Press
Save settingsto save your changes.

Column limits
Each table in Clay has a column limit of 70. Of these, up to 30 can be action or integration columns. If you implement a waterfall, this integration column limit will be raised to 40.
Create children columns from a parent column
When you enrich data within Clay, your results will be presented as arrays of data, which sometimes includes nested endpoints. You can create individual child columns by mapping specific endpoints from the parent column’s enrichment.
Add a new child column
To create a new column with an endpoint from an enrichment (parent column):
- Click on the cell of the enrichment containing the endpoint you want to use. This will open the Cell details panel on the right.
- Hover over the endpoint you want to map out and to the right click
Add as column. - In the Add description as new column section, enter your column description and click
Create columnto generate a new column.
Map child columns to an existing column
To create a new column with an endpoint from an enrichment (parent column):
- Click on the cell of the enrichment containing the endpoint you want to use. This will open the Cell details panel on the right.
- Hover over the desired endpoint and click
Add as columnon the right. - Under Map to an existing column, click on the column you want you map this enrichment endpoint to. Note that this will overwrite the existing values within the destination column
Find the parent column of your child column
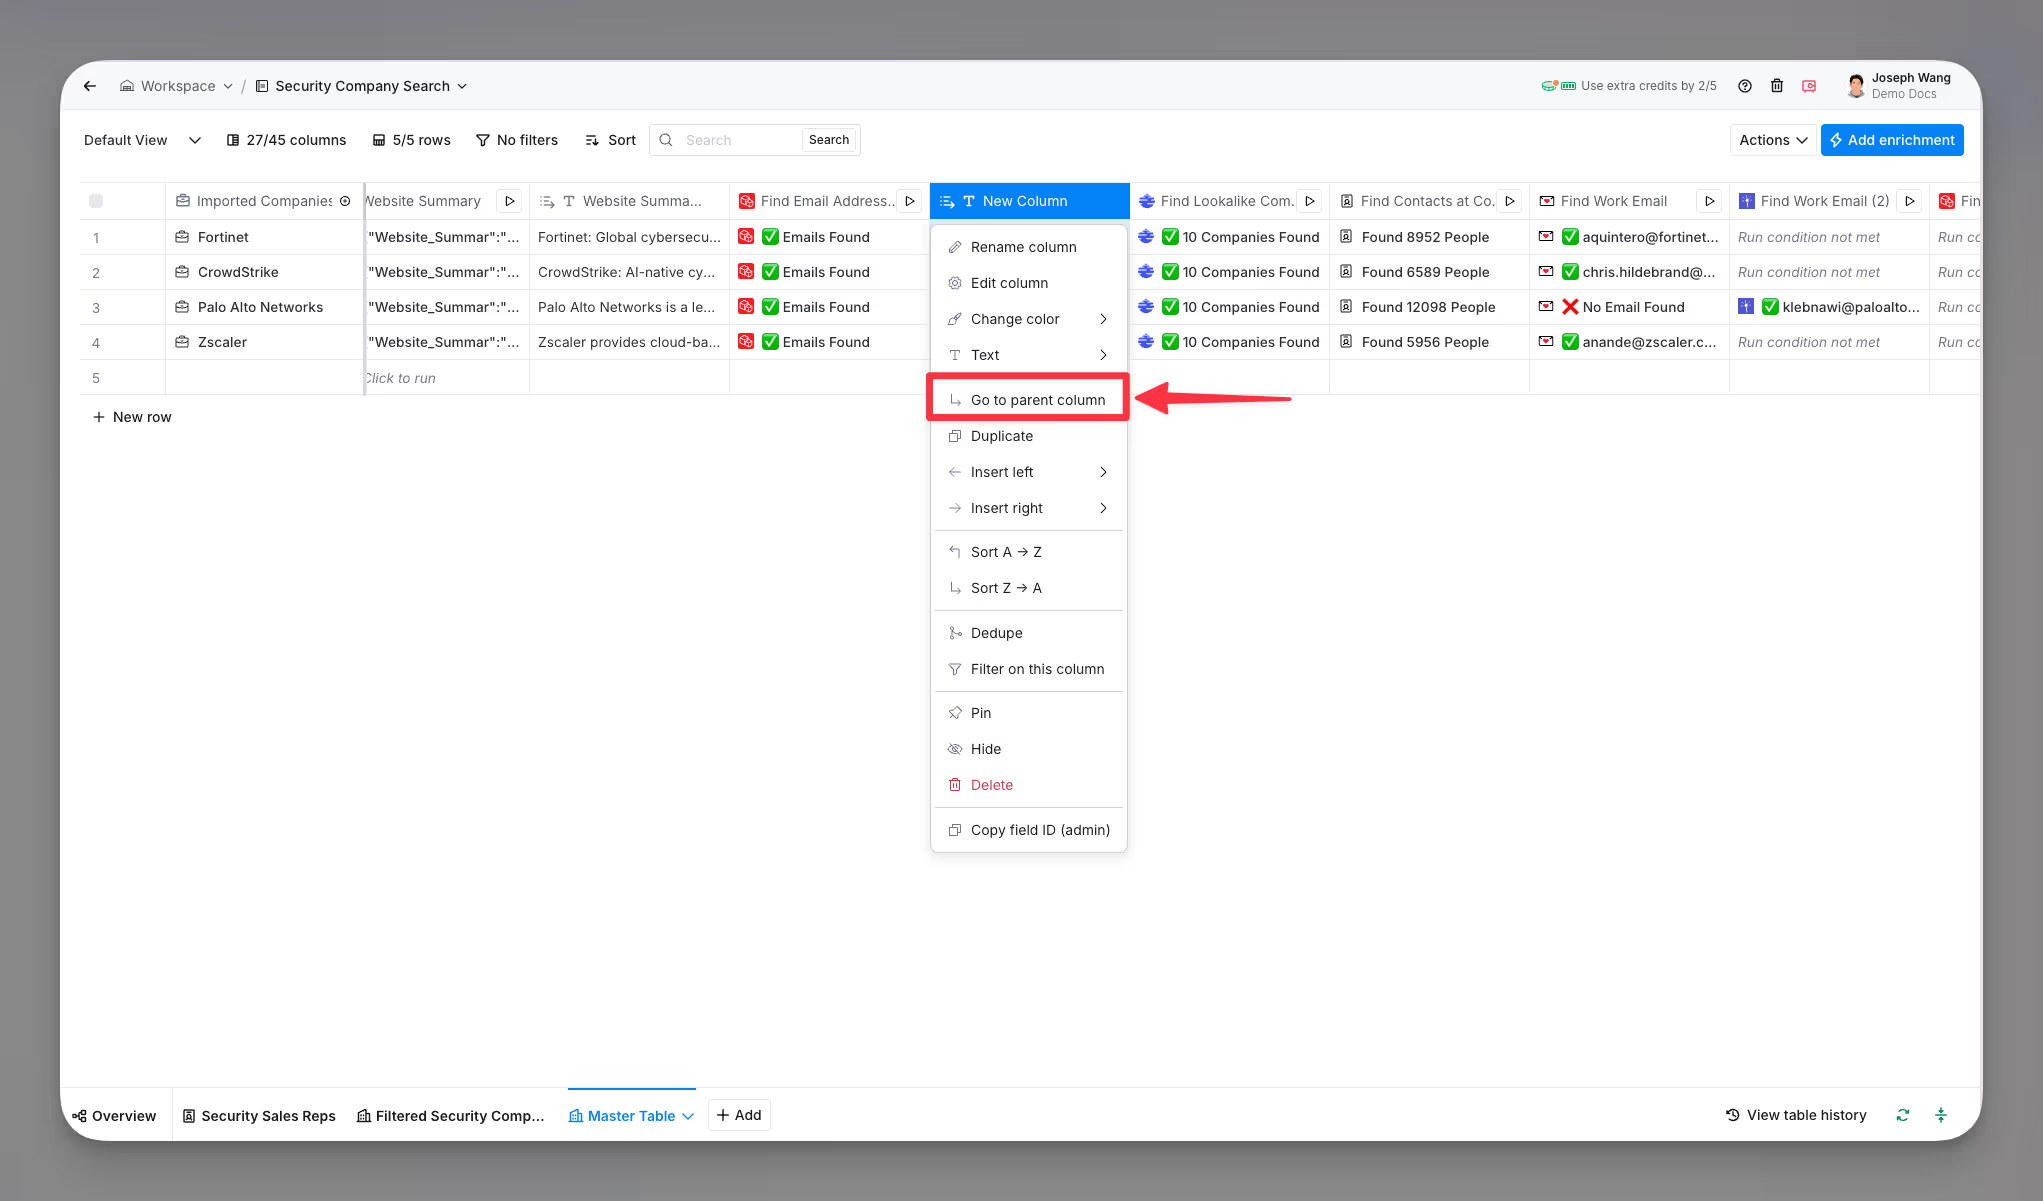
You can identify the parent column of a child column to better understand its data context. Follow these steps:
- Click on the child column to open the dropdown menu.
- Within the menu, select
Go to parent column.

Merge columns
You can merge data from multiple columns into a new column.
- Click
Add column→Merge columns. - Select a
Data typefrom the dropdown. - Write a formula, including any columns you want to add with
/. - Click
Save settings.
Hide columns
You can hide a column to help simplify your table view. This is helpful when you want to hide parents columns.
To hide a column:
- Click on the header of the column you want to hide to access the dropdown menu.
- Within the menu, select
Hide.
Dedupe columns
You can also dedupe your rows based a specific column’s values.
To dedupe a column:
- Click on the header of the column you want to dedupe to access the dropdown menu.
- Within the menu, select
Dedupe. - Confirm the duplicate values you want to remove and select
Delete.
A few rules to keep in mind for column deduplication:
- Deleted rows cannot be recovered, so proceed with caution.
- Duplicates are identified based on exact string matches.
- Deduplication is case-sensitive, meaning
Clayandclayare treated differently. - Extra whitespace is considered, so
Clay (with a space)andClayare not the same.
- Deduplication is case-sensitive, meaning
Rename columns
You can rename your columns to make them easier to identify. To rename a column:
- Click on the column header you want to rename.
- Select the
Renameoption from the dropdown menu. - Enter the new column name and press Enter to save it.
Pin columns
If your table has many columns, you can pin specific columns to keep them easily viewable. To pin a column:
- Click on the column header you want to pin.
- Select the
Pinoption from the dropdown menu.


