Goldcast was having their reps MANUALLY creating mockups of their online webinar events to send to prospects.
Their reps hated doing this because it took hours of their time.
So, I just automated the entire process with Clay 🤣
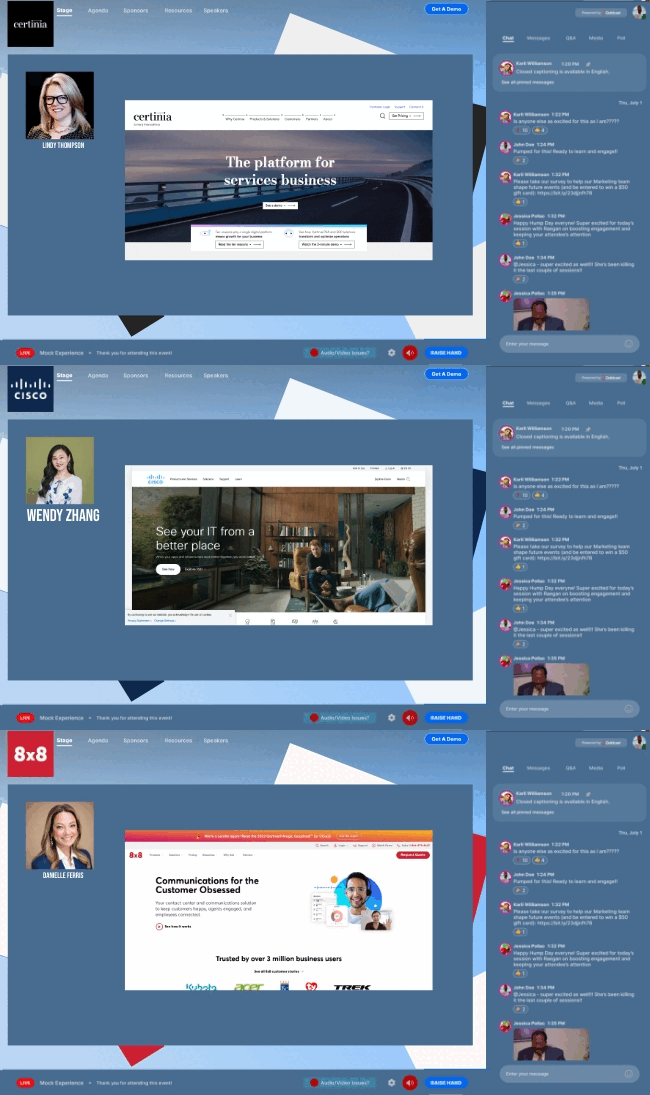
The final output gave us the mockups you see above (+ some other personalization variables for the email copy).
This automated email campaign also gave us a 83% OPEN RATE AND 6.8% REPLY RATE (yes, you read that right)…

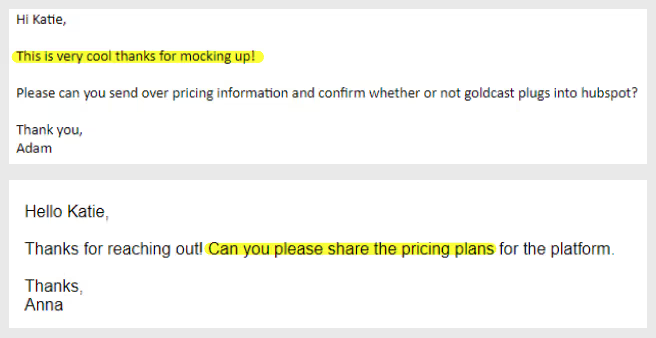
…and here’s some examples of the replies we got:
Not to brag or anything — but those are some CRAZY results.
Especially for it being 100% AUTOMATED!
Okay, okay…. I’m done humble-bragging. Here’s exactly how I did it:
How to Send Personalized Demos at Scale
This assumes you have a list of contacts with their full name, email, company website, etc. If not — you can create one using Apollo.
1. Validate Email + Exclude CRM Contacts
Use NeverBounce to check their email and make sure it’s valid. You can extract the result of NeverBounce into a separate column — and use that to check whether or not you should continue personalizing that contact.
Exclude Certain CRM Contacts
Now you’ll want to create 3 columns that lookup records in your CRM:
- Lookup contacts (based on their email):
- Check if they’ve already been sequenced
- Check if they’re an active customer
- Lookup accounts (based on their company domain):
- Check for any open opportunities
- Check if the account is an active customer
- Check for meetings (based on their email):
- Check for any meetings with that person
Then, you want to combine the results of all those columns into a single column called “CRM Check”. If the person doesn’t pass all of those checks, don’t continue personalization.
2. Check If They’re Running Events (With Claygent)
Use Claygent to Check If They’re Running Webinars or In-Person Events
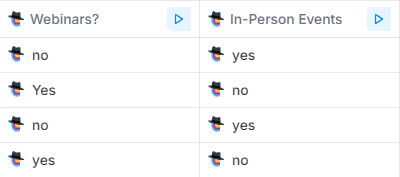
Create two Claygent enrichments that check the company's website for either webinar or in-person events. If it finds that they’re running either, we’ll pull out the events they’re running and allow the next enrichments to run.
Normalize Event Name
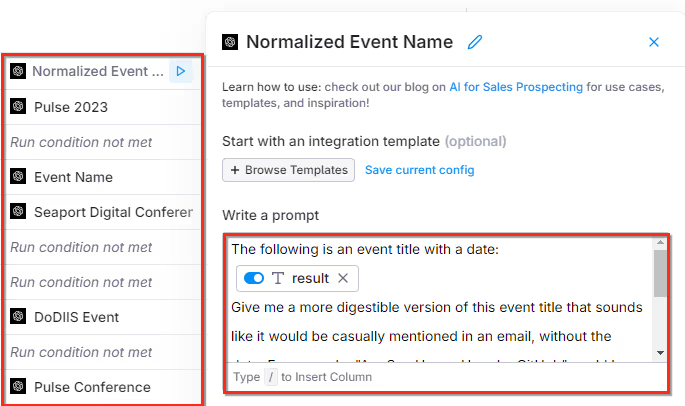
If we find that they’re running events, we’ll want to normalize the event name so it looks like a human wrote it (instead of a copy-paste title from their website).
You can do this using a simple AI enrichment that in the event title/date and outputs a more casual-sounding version of it.
NOTE: If you want the specific prompts we used to do all of this, you can find them at the bottom of this article.
3. Create The Personalized Demo Mockup
Now, it’s time to create a personalized demo mockup, like these:

Grab Their Profile Picture & Company Logo
Pull out their social profile picture by expanding the properties of any enriched profile, find the “Picture URL Copy” property, and click “Add as Column”:
Pull out their company logo by expanding the properties of any enriched company, find the “Logo URL” property, and click “Add as Column”:

(you’ll want to upload both images to a separate server, but that’s out of the scope of this article)
Pull Out The Primary Colors From Their Logo
Now, you’ll want to figure out their company’s primary colors. We did this with the imagga API. Just add a HTTP GET call enrichment column and set the endpoint to: “https://api.imagga.com/v2/colors?image_url=[COMPANY LOGO URL HERE]”

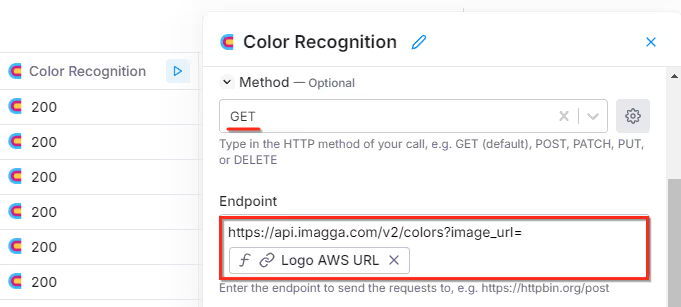
Then, you’ll be able to pull out the primary RGB colors of their logo.
Take a Screenshot of Their Website
To get a screenshot of their website’s homepage — we used ScreenshotAPI. Just add a HTTP GET call enrichment column and set the endpoint to: “https://shot.screenshotapi.net/screenshot?token=[YOUR API TOKEN]&url=[COMPANY WEBSITE URL]”
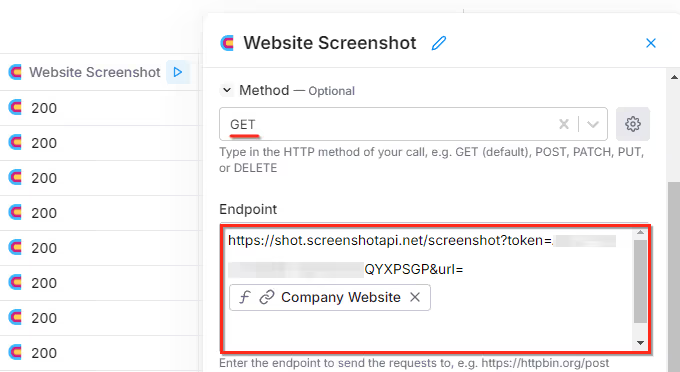
Then, you’ll be able to pull out the website screenshot URL from the response.
Compile Everything Into a Final Mockup
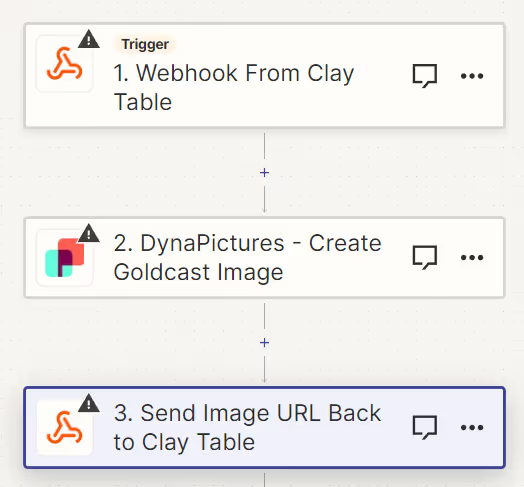
Finally, we’ll combine all of the information we’ve got to create the mockup image using Zapier + DynaPictures API:
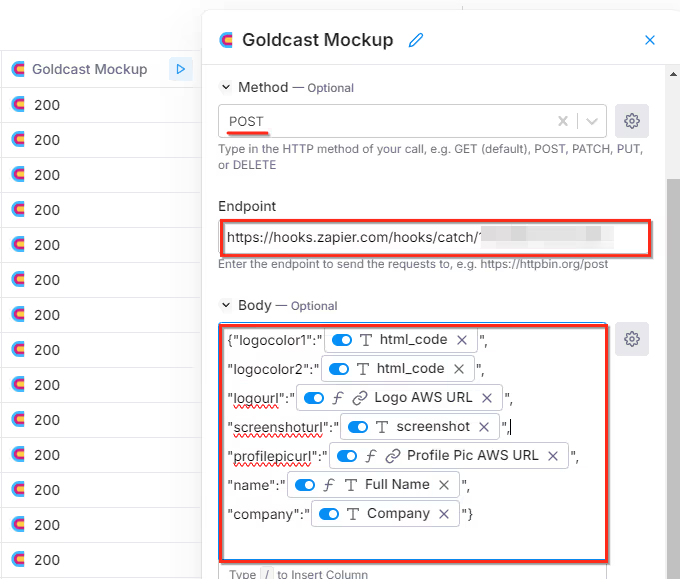
Next, you can connect Zapier with DynaPictures. Before you do that, you’ll need to create a DynaPictures account and upload the image template. Then, you just pass DynaPictures the above information and specify the image template to use. Then send the newly created image URL back to Clay.
4. Find “Other” Contact for Breakup Email
Lastly, we’ll want to find another marketing contact in their company to use in the last email (where we ask if that person would be a better person to reach out to). Here’s how:
Find Marketing Leaders in Their Company
Just create another enrichment column, add the companies social profile URL as the identifier, include marketing leadership roles, and make sure to EXCLUDE the job title of the main contact you’re reaching out to (so they don’t end up included).
5. Export Clay Table & Import Into Email Campaign

Finally, package up all of those personalization variables into an output view. Then, export the output view as a CSV and import it into whatever email sending tool you’re using (Instantly, Smartlead, etc).
It’s really that simple.
Goldcast was having their reps MANUALLY creating mockups of their online webinar events to send to prospects.
Their reps hated doing this because it took hours of their time.
So, I just automated the entire process with Clay 🤣

The final output gave us the mockups you see above (+ some other personalization variables for the email copy).
This automated email campaign also gave us a 83% OPEN RATE AND 6.8% REPLY RATE (yes, you read that right)…

…and here’s some examples of the replies we got:

Not to brag or anything — but those are some CRAZY results.
Especially for it being 100% AUTOMATED!
Okay, okay…. I’m done humble-bragging. Here’s exactly how I did it:
How to Send Personalized Demos at Scale
This assumes you have a list of contacts with their full name, email, company website, etc. If not — you can create one using Apollo.
1. Validate Email + Exclude CRM Contacts
Use NeverBounce to check their email and make sure it’s valid. You can extract the result of NeverBounce into a separate column — and use that to check whether or not you should continue personalizing that contact.
Exclude Certain CRM Contacts
Now you’ll want to create 3 columns that lookup records in your CRM:
- Lookup contacts (based on their email):
- Check if they’ve already been sequenced
- Check if they’re an active customer
- Lookup accounts (based on their company domain):
- Check for any open opportunities
- Check if the account is an active customer
- Check for meetings (based on their email):
- Check for any meetings with that person
Then, you want to combine the results of all those columns into a single column called “CRM Check”. If the person doesn’t pass all of those checks, don’t continue personalization.
2. Check If They’re Running Events (With Claygent)
Use Claygent to Check If They’re Running Webinars or In-Person Events

Create two Claygent enrichments that check the company's website for either webinar or in-person events. If it finds that they’re running either, we’ll pull out the events they’re running and allow the next enrichments to run.
Normalize Event Name

If we find that they’re running events, we’ll want to normalize the event name so it looks like a human wrote it (instead of a copy-paste title from their website).
You can do this using a simple AI enrichment that in the event title/date and outputs a more casual-sounding version of it.
NOTE: If you want the specific prompts we used to do all of this, you can find them at the bottom of this article.
3. Create The Personalized Demo Mockup
Now, it’s time to create a personalized demo mockup, like these:

Grab Their Profile Picture & Company Logo
Pull out their social profile picture by expanding the properties of any enriched profile, find the “Picture URL Copy” property, and click “Add as Column”:
Pull out their company logo by expanding the properties of any enriched company, find the “Logo URL” property, and click “Add as Column”:

(you’ll want to upload both images to a separate server, but that’s out of the scope of this article)
Pull Out The Primary Colors From Their Logo
Now, you’ll want to figure out their company’s primary colors. We did this with the imagga API. Just add a HTTP GET call enrichment column and set the endpoint to: “https://api.imagga.com/v2/colors?image_url=[COMPANY LOGO URL HERE]”


Then, you’ll be able to pull out the primary RGB colors of their logo.
Take a Screenshot of Their Website
To get a screenshot of their website’s homepage — we used ScreenshotAPI. Just add a HTTP GET call enrichment column and set the endpoint to: “https://shot.screenshotapi.net/screenshot?token=[YOUR API TOKEN]&url=[COMPANY WEBSITE URL]”

Then, you’ll be able to pull out the website screenshot URL from the response.
Compile Everything Into a Final Mockup
Finally, we’ll combine all of the information we’ve got to create the mockup image using Zapier + DynaPictures API:

Next, you can connect Zapier with DynaPictures. Before you do that, you’ll need to create a DynaPictures account and upload the image template. Then, you just pass DynaPictures the above information and specify the image template to use. Then send the newly created image URL back to Clay.

4. Find “Other” Contact for Breakup Email
Lastly, we’ll want to find another marketing contact in their company to use in the last email (where we ask if that person would be a better person to reach out to). Here’s how:
Find Marketing Leaders in Their Company
Just create another enrichment column, add the companies social profile URL as the identifier, include marketing leadership roles, and make sure to EXCLUDE the job title of the main contact you’re reaching out to (so they don’t end up included).
5. Export Clay Table & Import Into Email Campaign

Finally, package up all of those personalization variables into an output view. Then, export the output view as a CSV and import it into whatever email sending tool you’re using (Instantly, Smartlead, etc).
It’s really that simple.


.png)








.avif)


.avif)
.avif)


