Hubspot integration overview
All-in-one CRM platform for marketing, sales, and customer service.
Hubspot Overview
Clay's Hubspot integration enables users to interact with your Hubspot data by looking up, creating, and updating current records with the enrichment panel. Alternatively, you can import records or reports as a source.
This guides covers the following tutorials around Hubspot:
- Hubspot use cases
- Setting up the Hubspot integration
- Importing Hubspot data into Clay
- Available Hubspot Actions
Supported Actions
Clay currently supports the following Hubspot actions:
- Import company
- Import contact
- Import deal
- Create object
- Lookup object
- Update object
- Create association
- Retrieve associated objects
Learn more about the individual actions below.
Setting up the Hubspot Integration
Requirements to Getting Set Up
Setting up fields for exporting
Export fields refer to the specific CRM fields where data from Clay will be mapped and stored during an integration. These are either pre-existing fields in your CRM (e.g., “Contact Name” or “Lead Status”) or new, custom fields created specifically for handling data from Clay.
When integrating Clay with HubSpot, follow these steps to set up export fields:
Step 1: Decide export field type
Existing Fields: Export Clay data into fields already in your CRM (e.g., “Lead Status” or “Company Name”). Use this if your workflow is established.
Custom Fields: Create new fields in your CRM for data from Clay. This is ideal for testing or tracking new data points.
Step 2 (Optional): Ensure table and CRM data type matches
To avoid export errors, it’s important to match the data type in your Clay table with the corresponding field type in your CRM. Please check the data type of the column you are exporting.
For example, if you’re exporting dates, they should follow Unix time set to midnight to ensure compatibility with your CRM.
For more information on mapping data types, please reference Hubspot's documentation.
Important: If the data type does not match, the export will fail. Double-check field types in your CRM to ensure successful data transfer.
Step 3: Test and export
Run a small test export to ensure data is mapping correctly to your CRM fields.
Confirm that updates appear as expected and adjust mappings if needed.
Hubspot Permissions
To connect Clay to Hubspot, your Hubspot account needs read and write access to the following objects:
- Contacts
- Companies
- Deals
- Any custom object you want to enrich with Clay
How to connect Hubspot to Clay
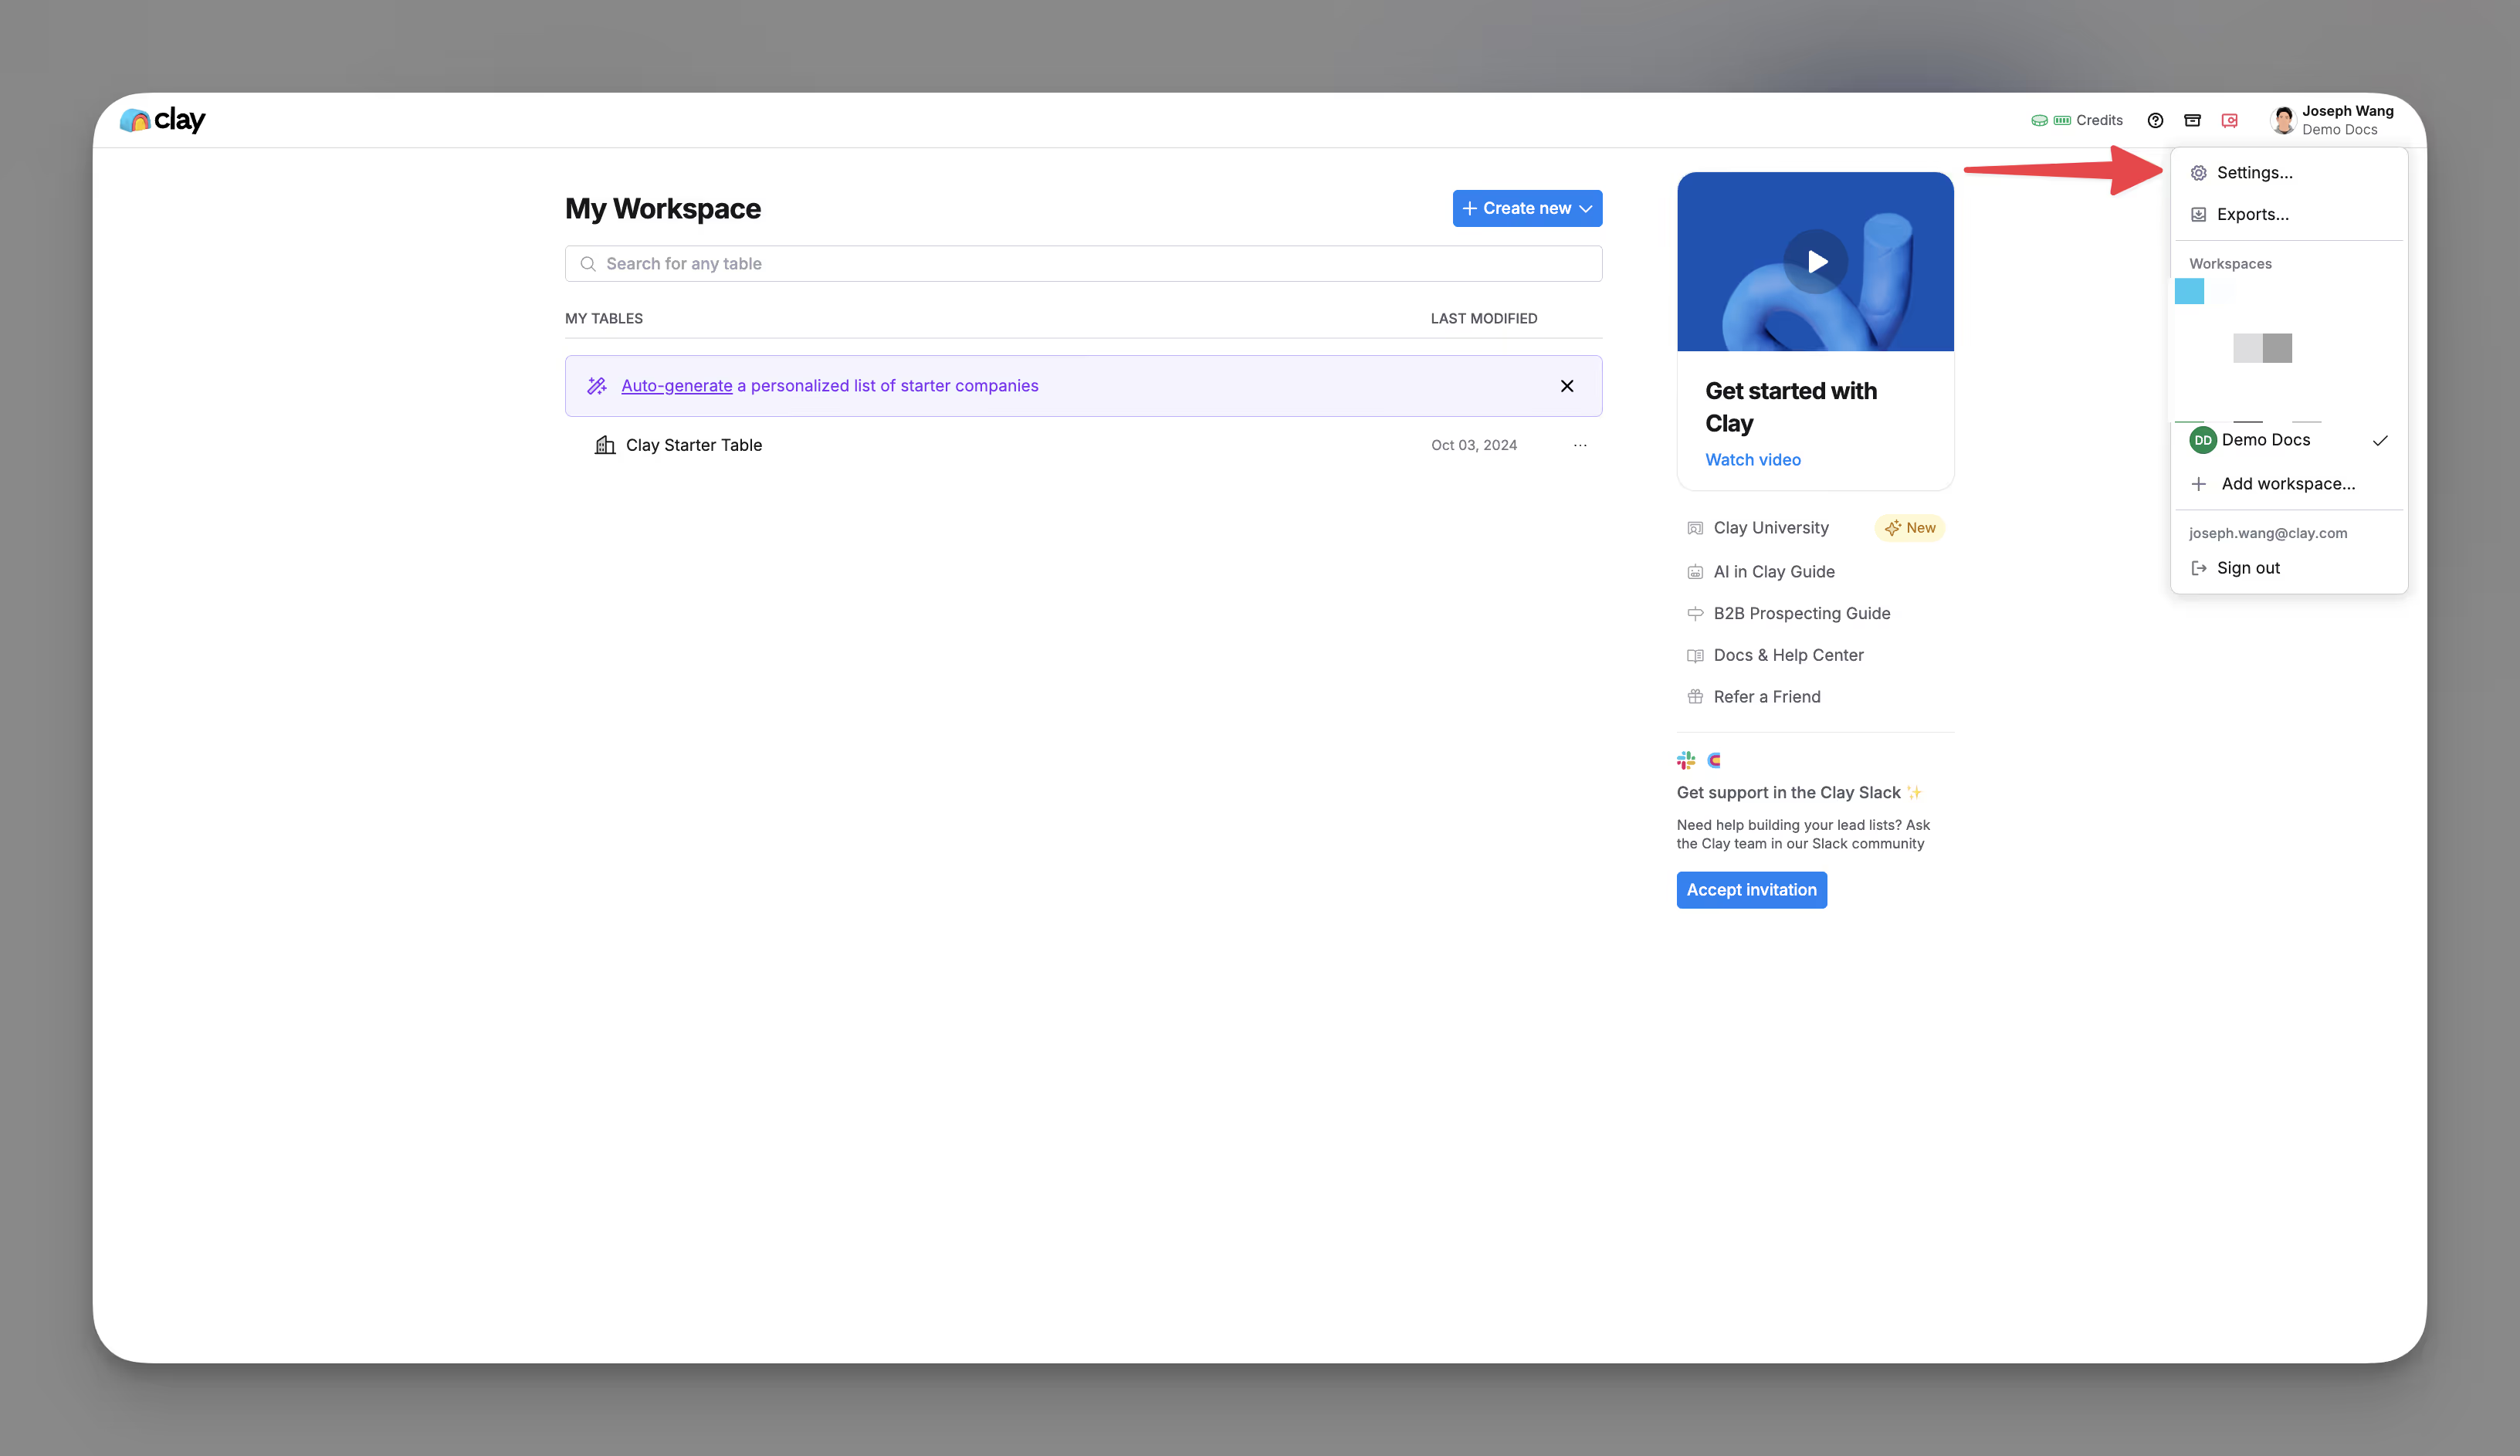
Step 1: Navigate to your Connections section
Click on your profile picture in the top navigation bar and head over to Settings.
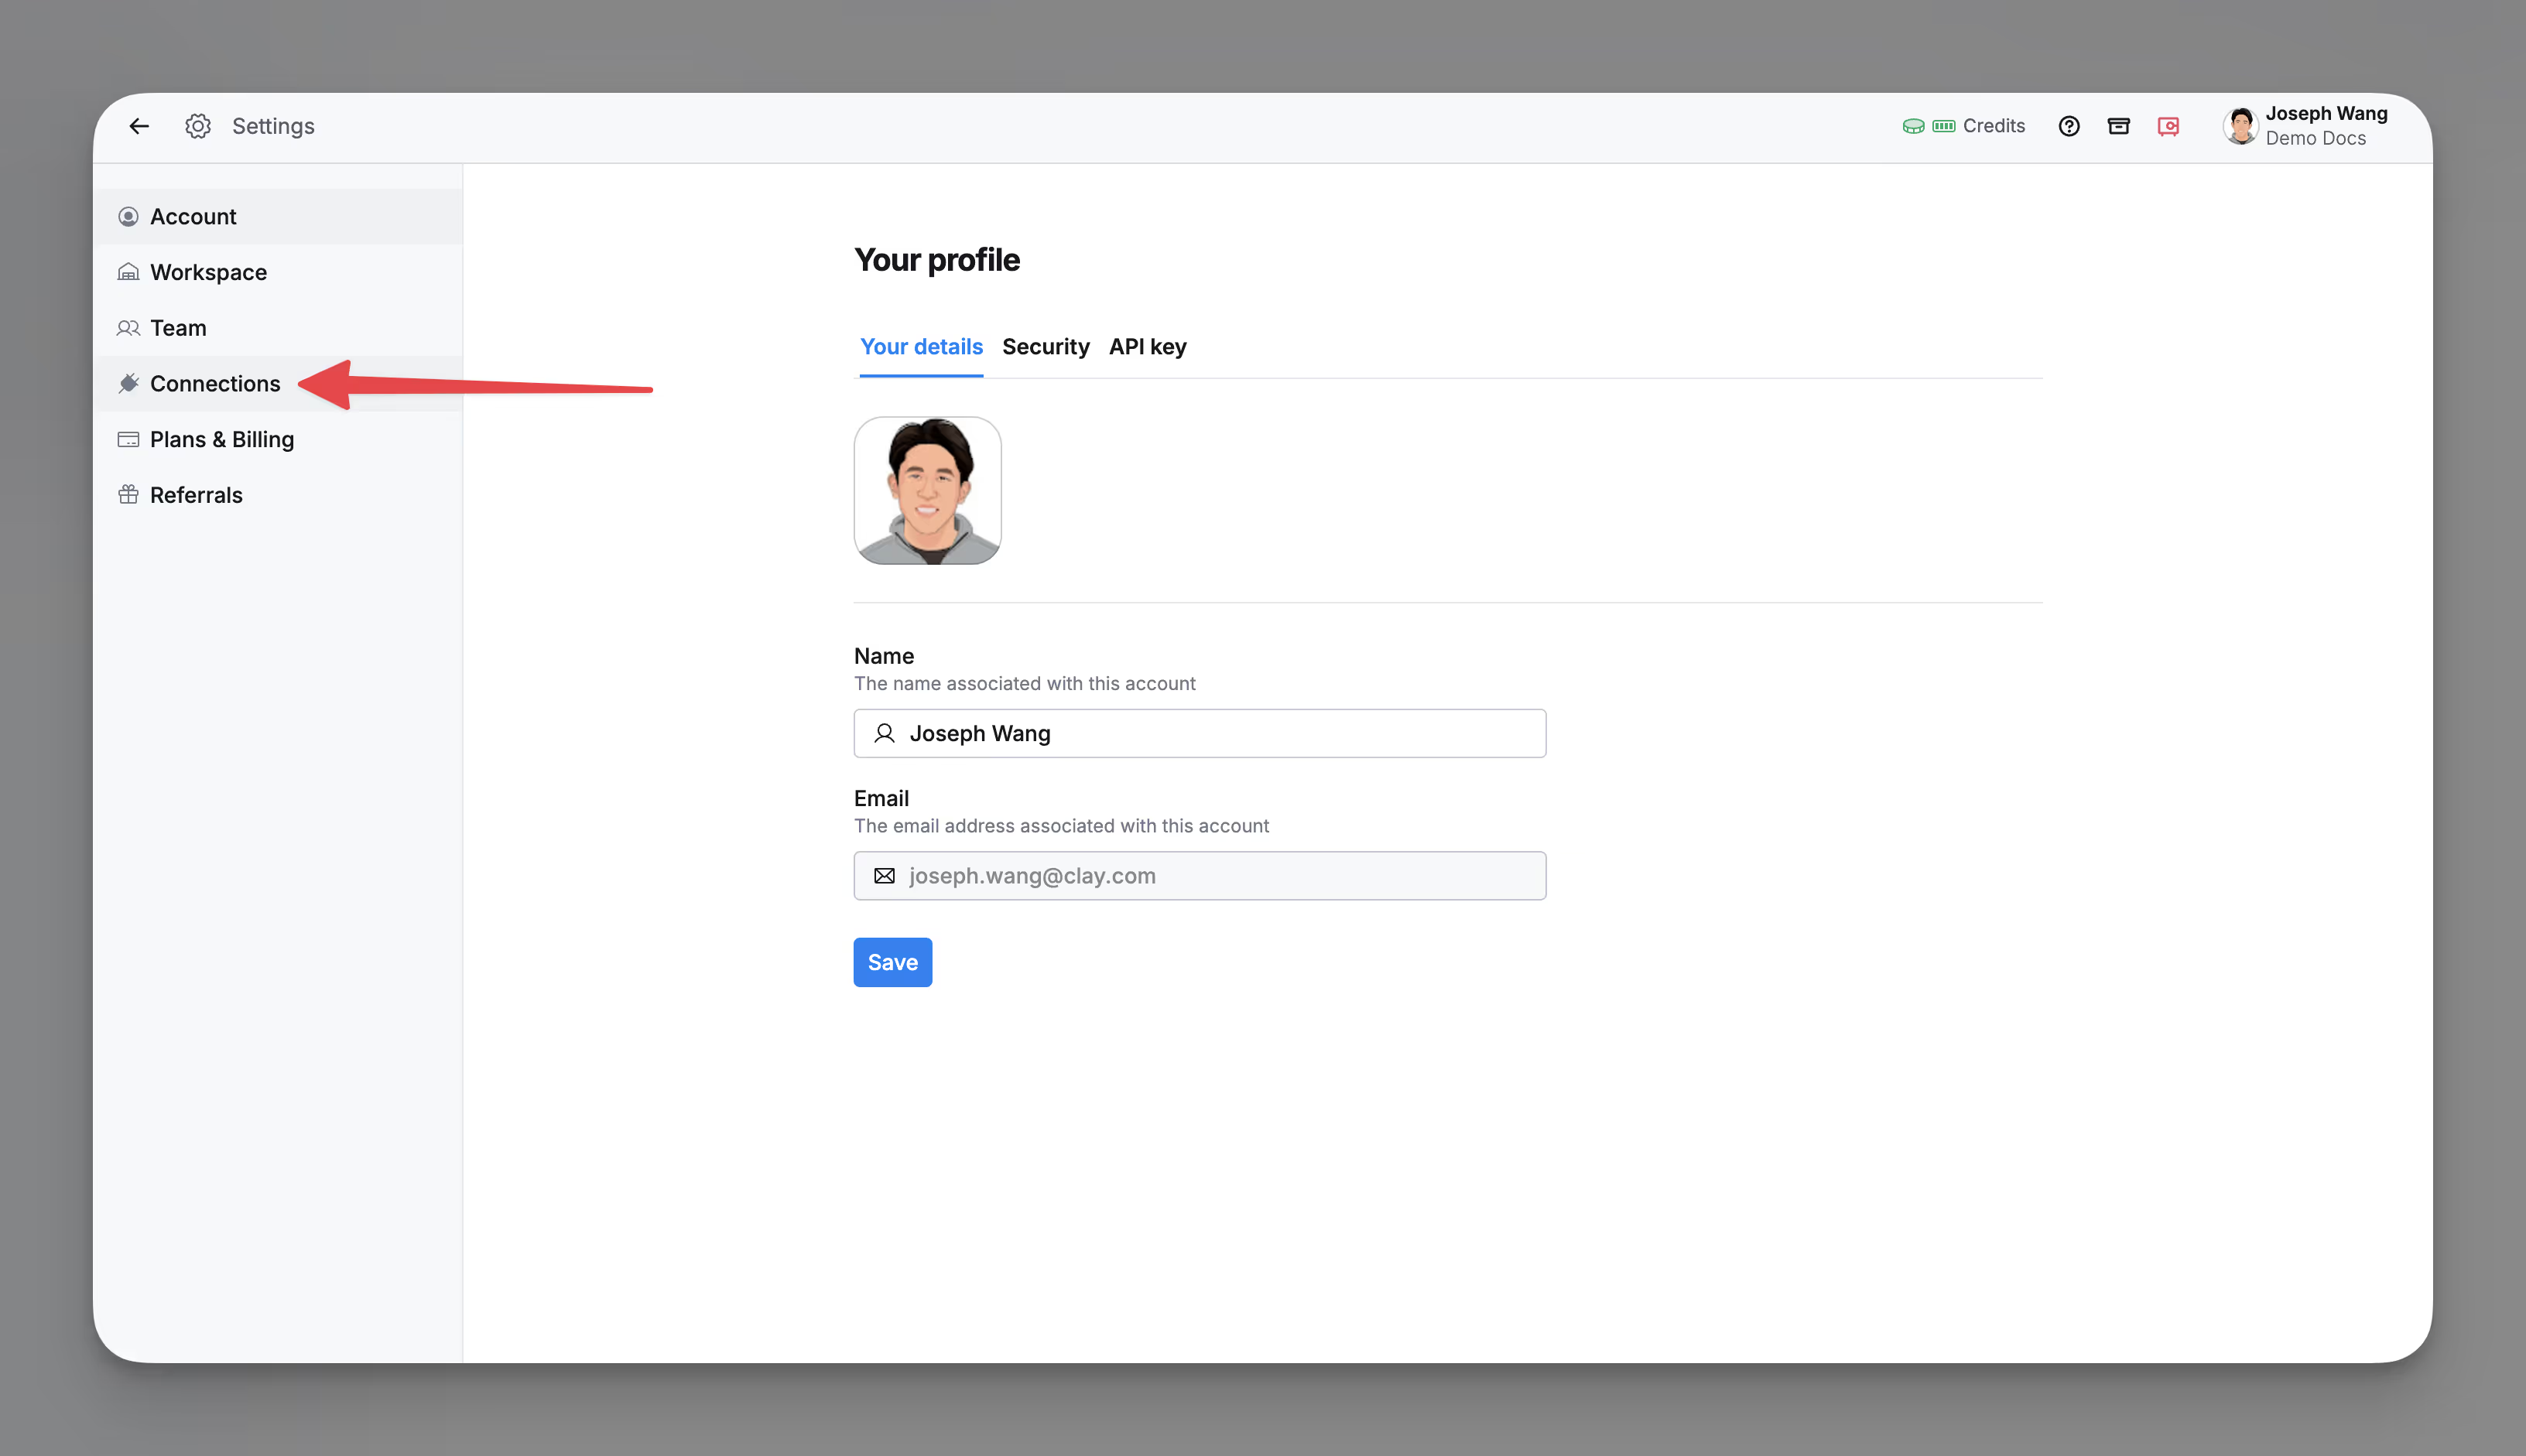
Within Settings, navigate to the Connections section.
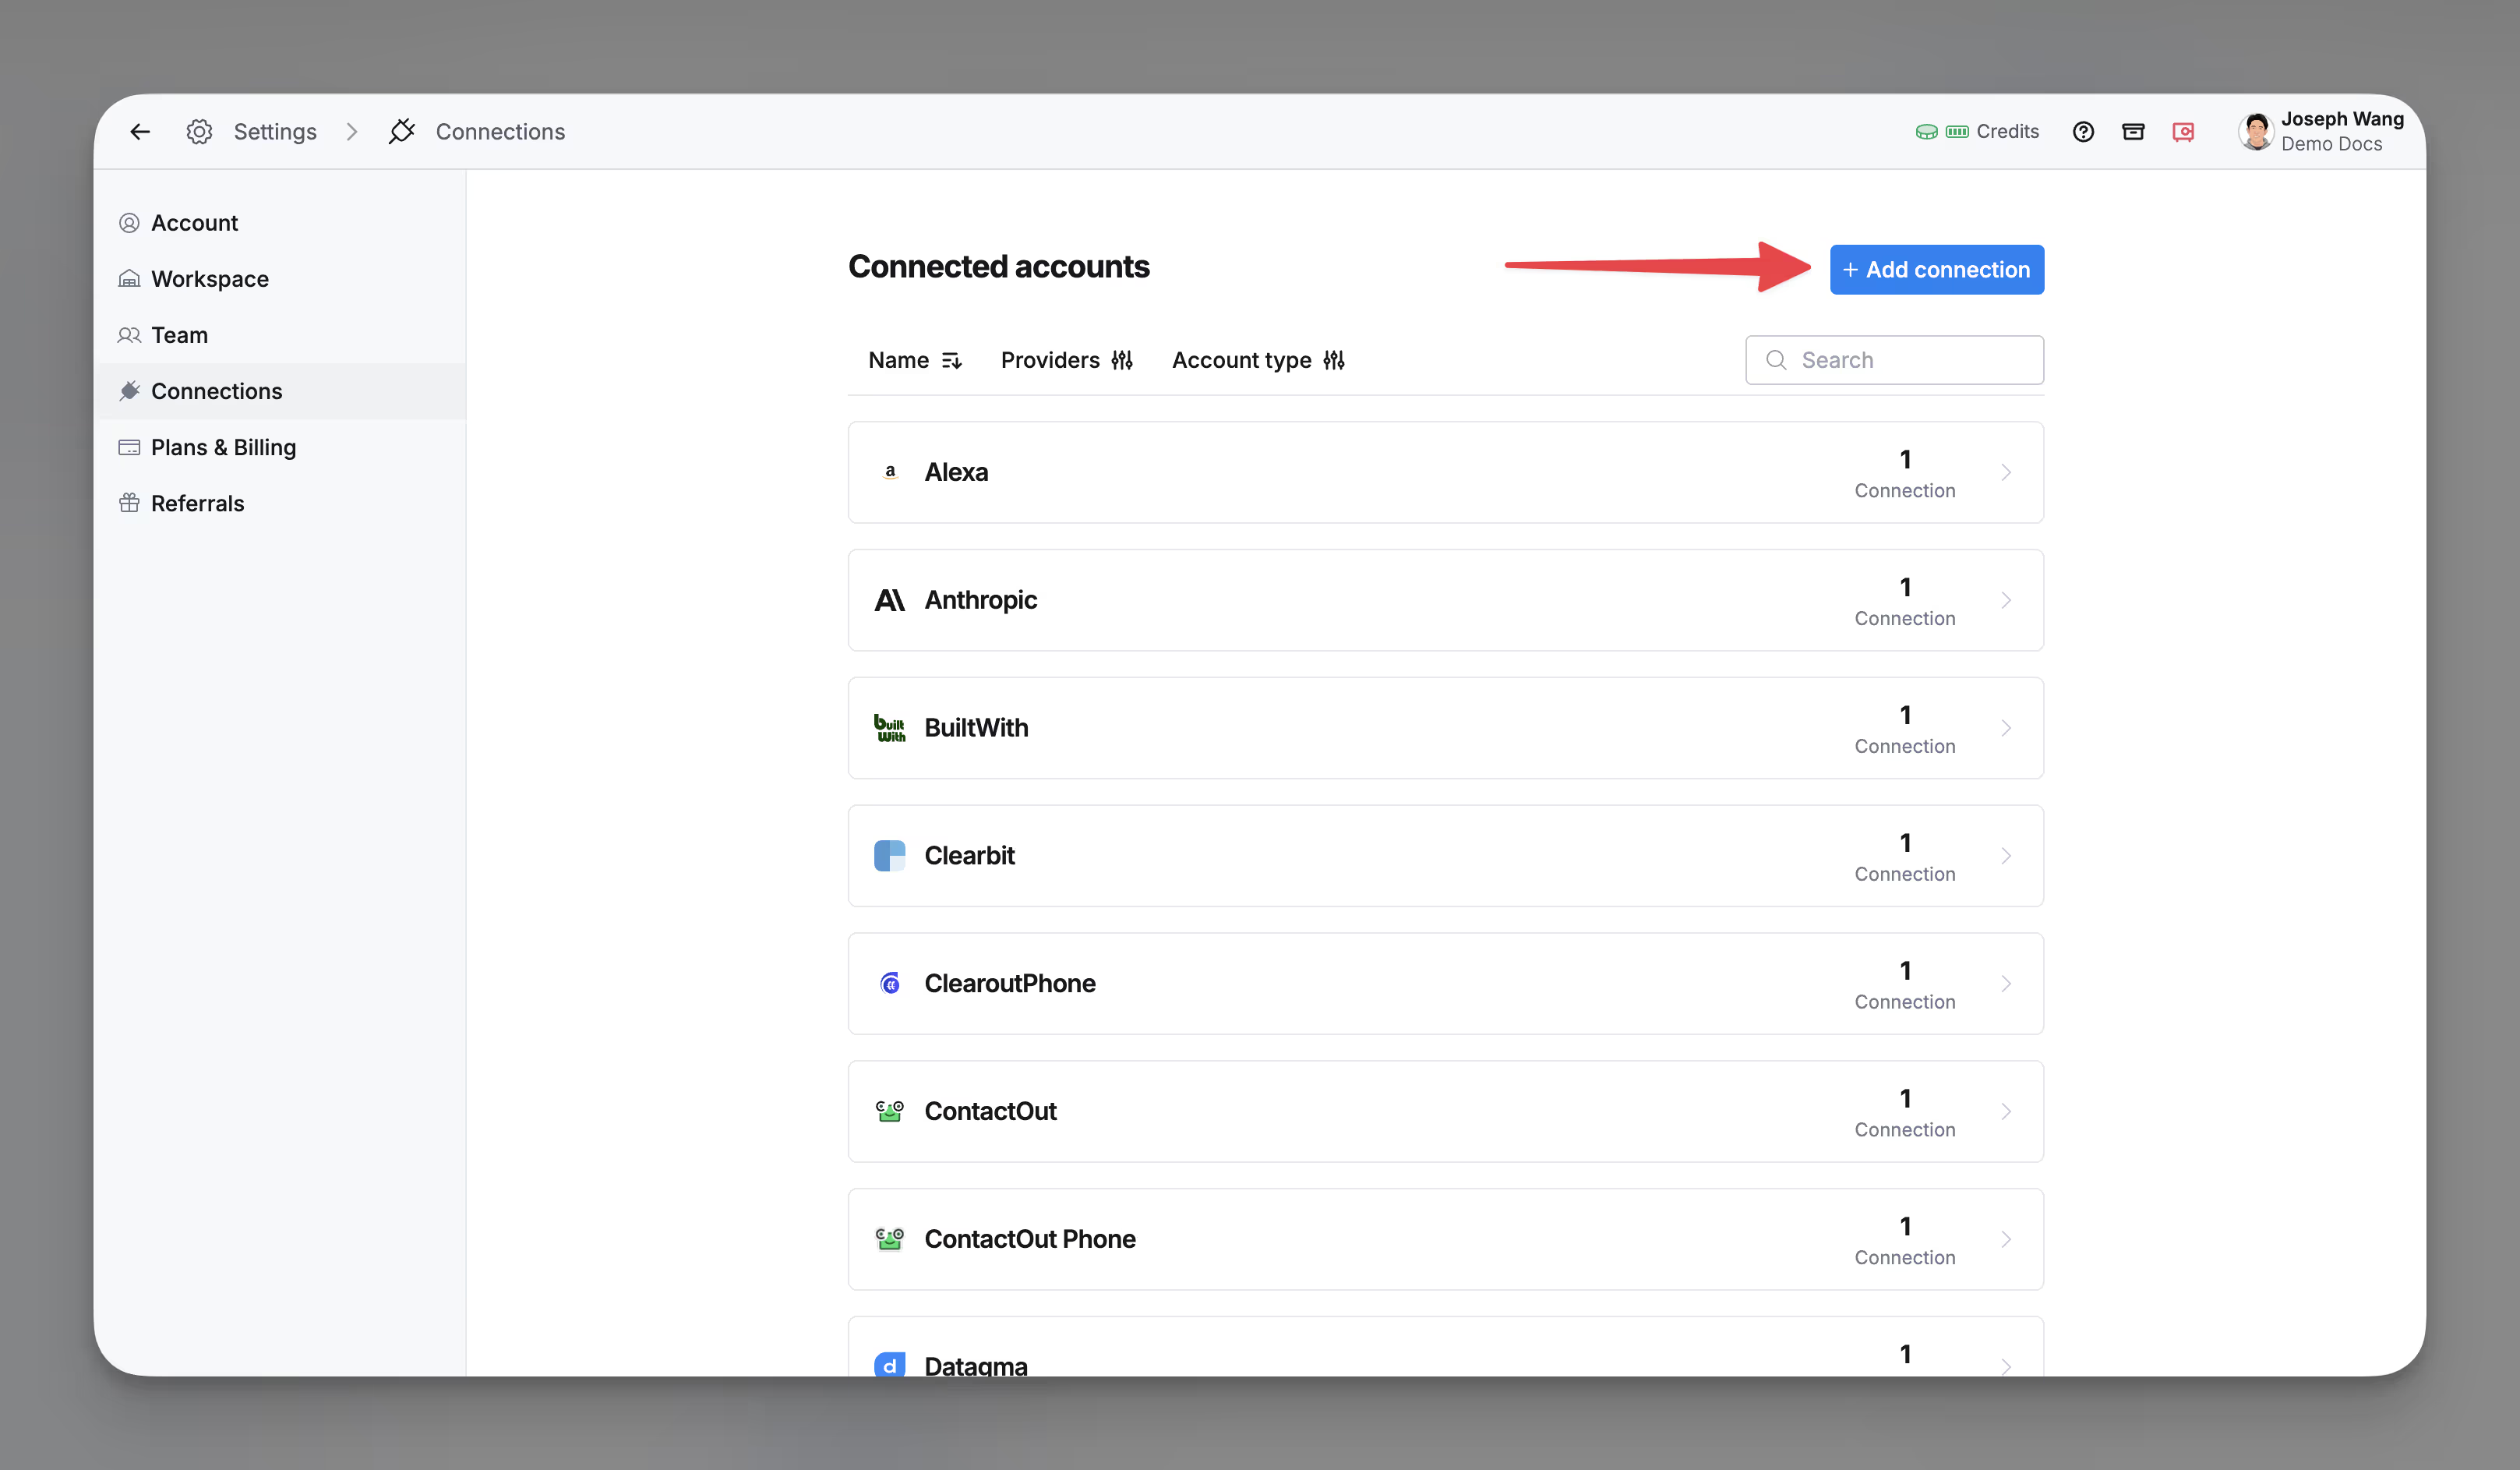
To add a Hubspot integration, click Add connection and type in “Hubspot”.
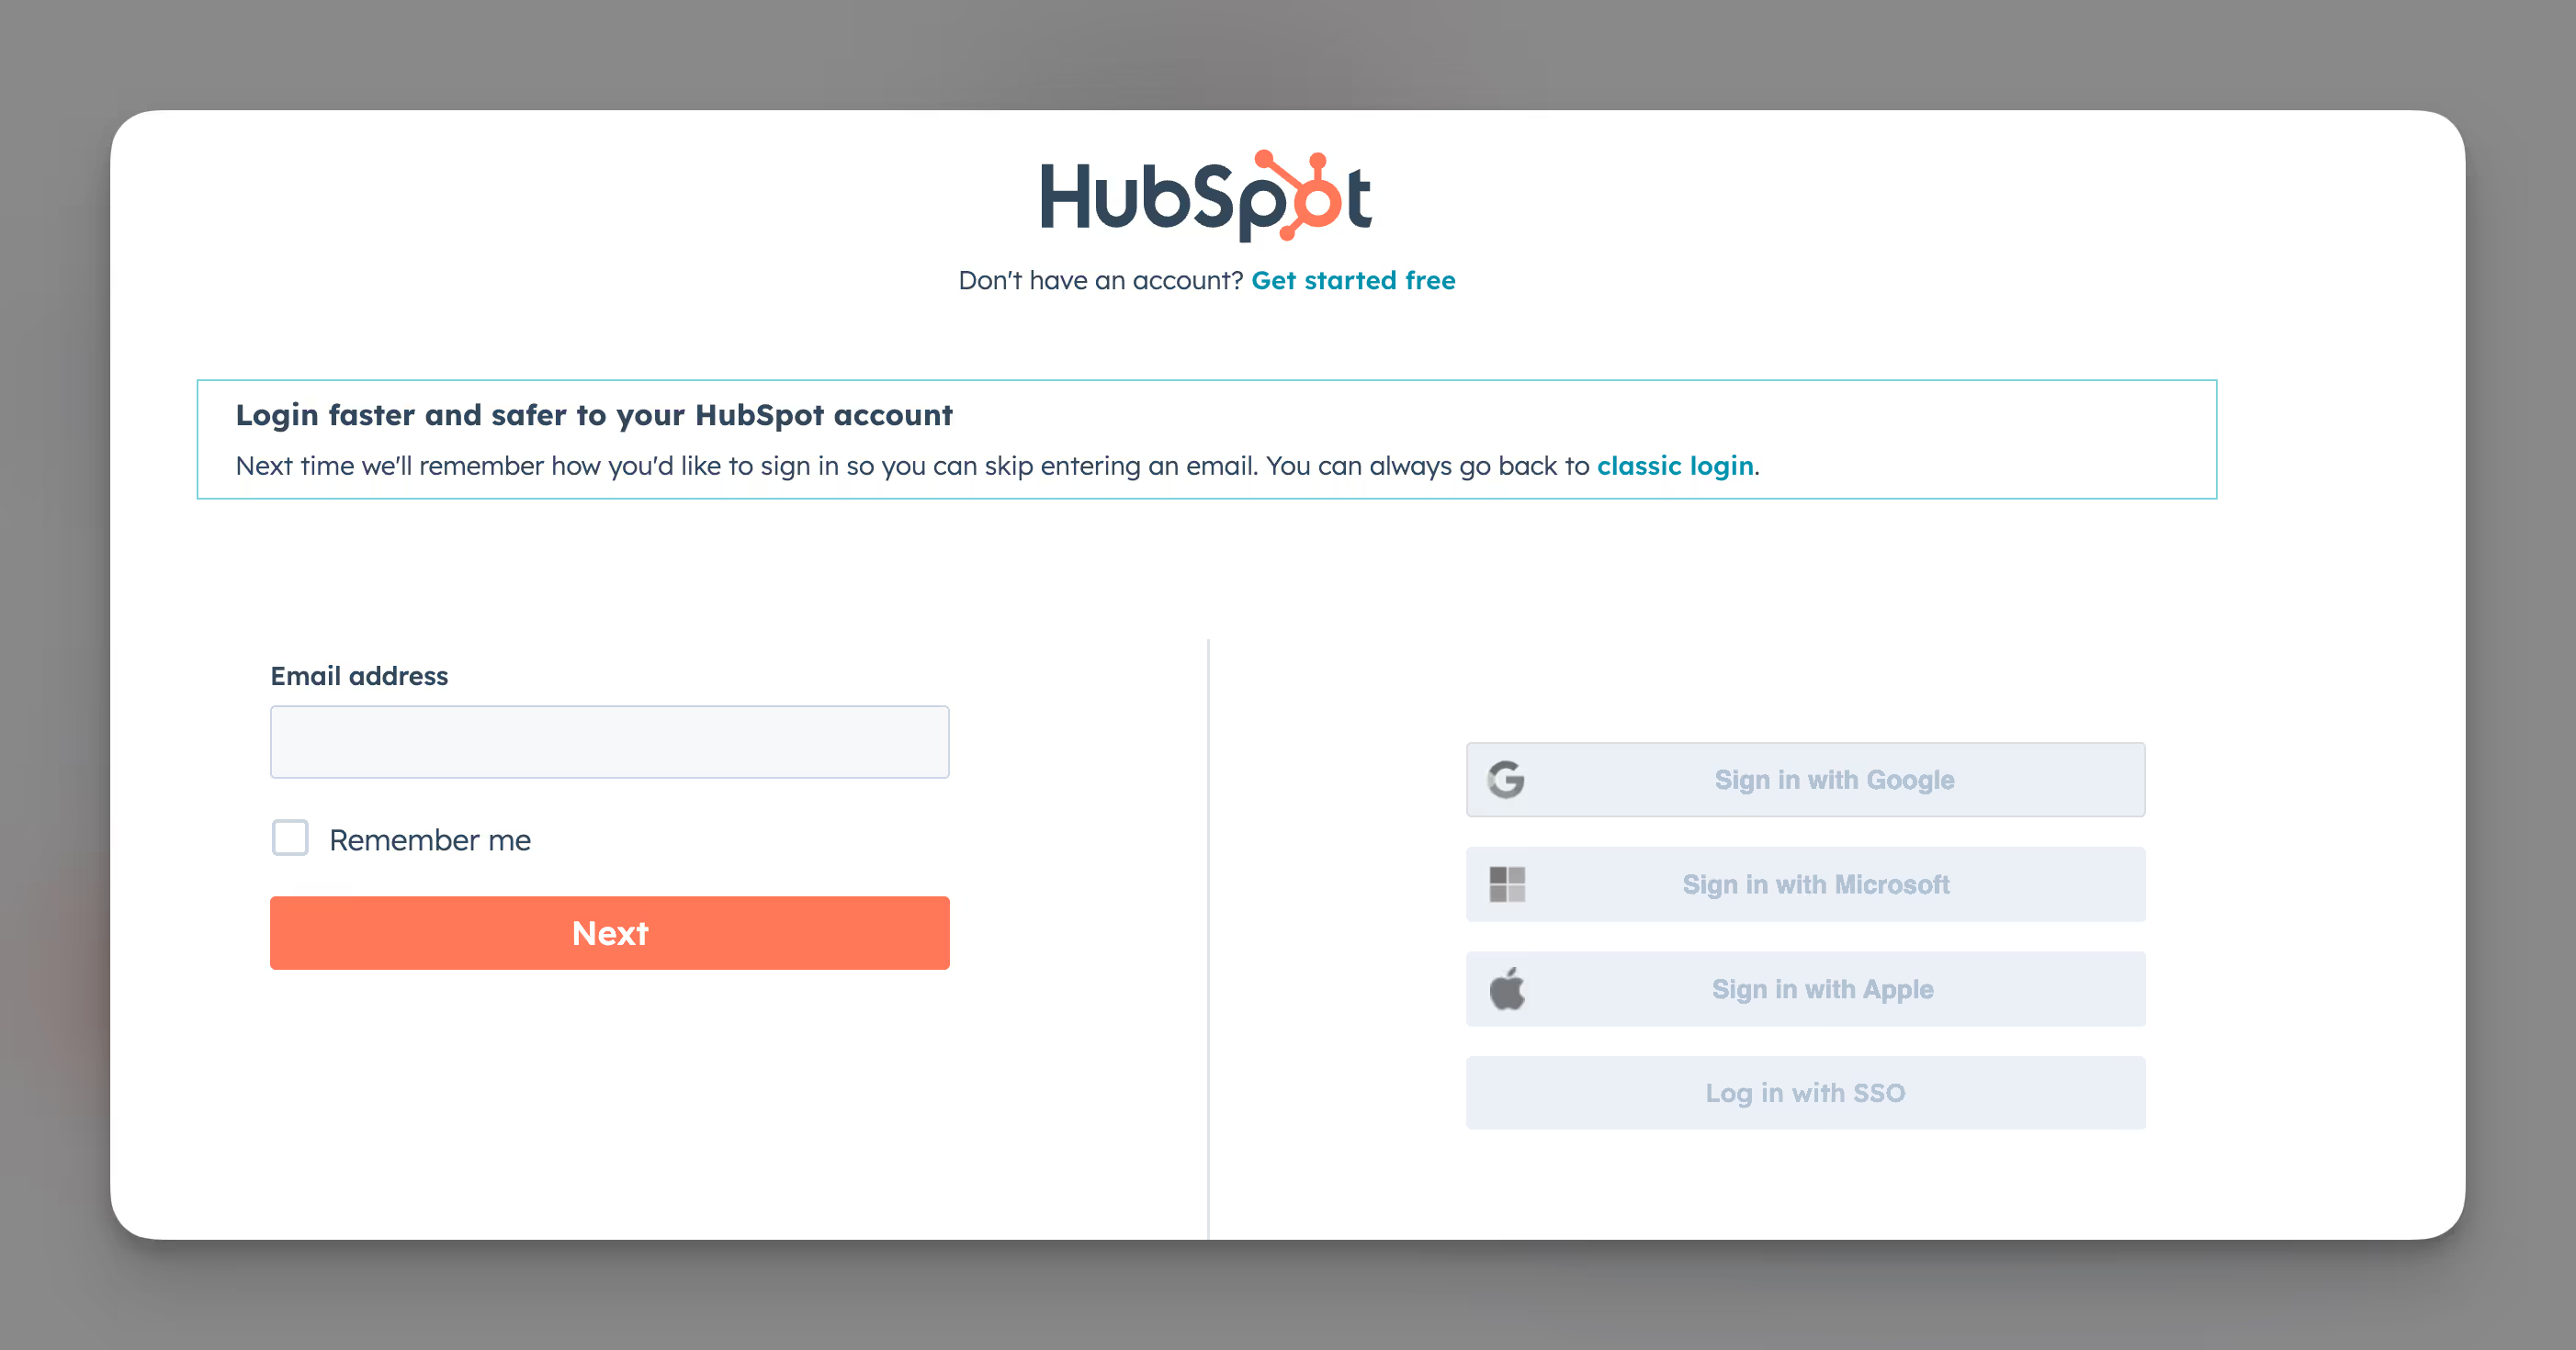
Step 2: Authenticate your Hubspot account
To connect Hubspot to your Clay account, you’ll need to authenticate HubSpot access.
Step 3: Create your account key
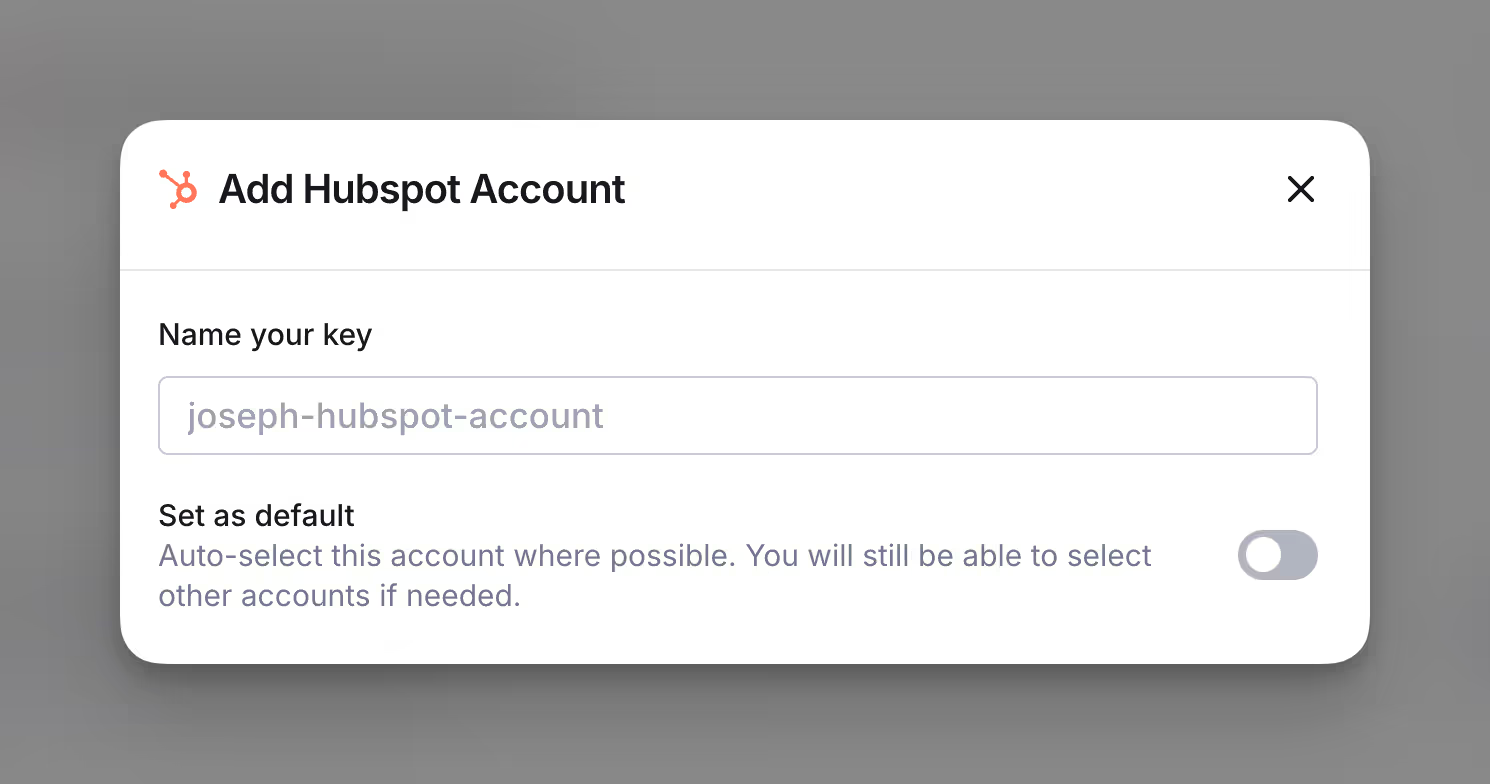
Once you’ve authenticated your Hubspot account, you will be taken to a page Add Hubspot Account.
On this page, you can name your Hubspot “Key” (i.e., account name) and set this connected account as the default via the Set as default toggle.
Importing Hubspot data into Clay
You can import Hubspot Company, Contact, and Deal data into Clay.
To import Company, Contact, or Deal data into your table:
Step 1: Navigate to the Source panel.
To access source panel:
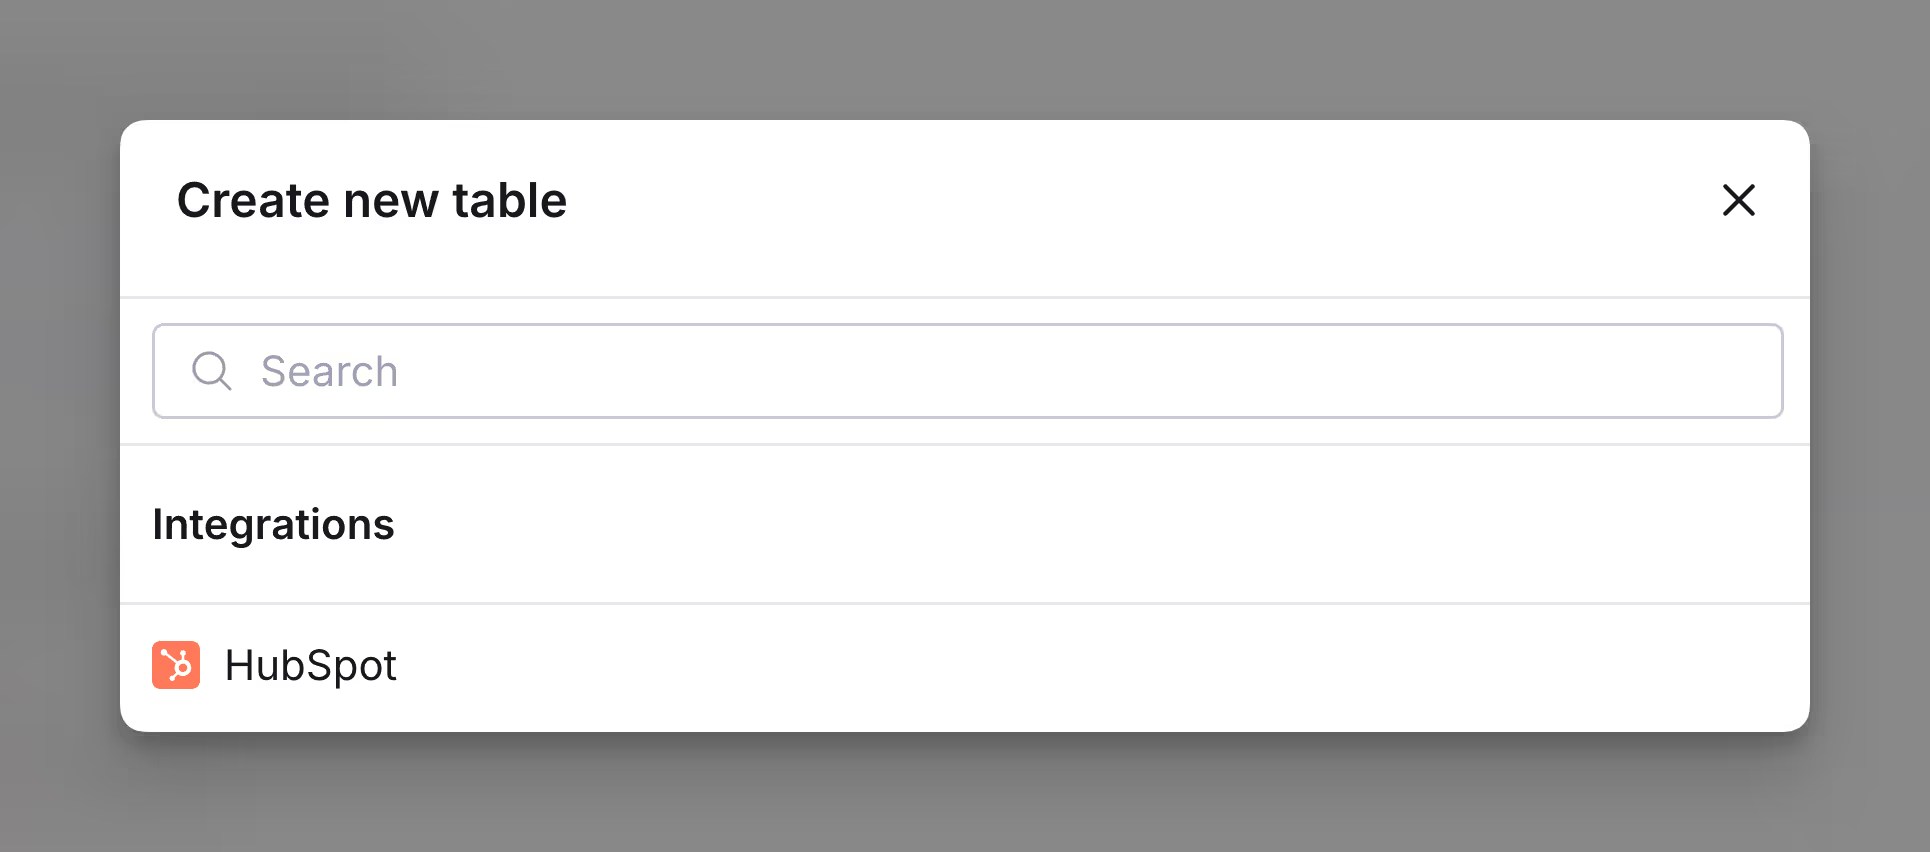
- New Tables: From your Workspace Home, select + Create new and search “Hubspot” to import your Hubspot data.
- Existing Table: In an existing table, open the table and select Actions > Import to configure Hubspot as a data source.
Step 2: Select the HubSpot account you want to connect.
Step 3: Specify the Object Type to import.
Step 4 (Optional): Choose the list from which you want to pull from Hubspot.
If no list is specified, all the data will be pulled.
Step 5 (Optional): Enable Read-Only Properties.
If you lack the necessary permissions to access certain data for enrichment, make sure to toggle this option. This ensures you can include read-only properties in the response.
Step 6 (Optional): Select to exclude empty properties.
If you select this option, the response will exclude all properties that are empty. If you do not select this option, the response will include all properties, including ones with empty values.
Available Hubspot Actions
Within your Clay table, you’re able to run the following Hubspot-supported actions:
- Create object
- Update object
- Lookup object
- Create association
- Retrieve associated objects
Action Create Object
Create a new company or a set of records in Hubspot.
This action allows you to specify the properties of the records you’re creating, allowing you to use data from other columns. Clay supports the following objects:
- Company
- Contact
- Deal
- Any custom objects
Action Walkthrough
To create a new object:
Step 1: Select the Hubspot account you want to use.
Step 2: Specify the object type you want to create.
Step 3: Map fields for the records you’re creating.
Match fields from your Clay table to the corresponding HubSpot properties, ensuring data types and formats align.
Tip: You can use the Show only mapped fields option to navigate the fields within the enrichment panel.
Step 4: Configure run settings.
By default, new rows within your Clay table will automatically create a new company within Hubspot. Learn more about auto-update in this brief guide.
To run enrichment only under specific conditions, use formulas that trigger the column when the formula is true. Learn more about AI formulas in this Clay University lesson.
Step 5: Run the enrichment to create the specified records.
Input Fields
- Object: Select the type of object you want to create (e.g., Company, Contact, Deal, or Custom Object). After selection, Clay automatically displays the available fields for that object.
- Object Fields: Note all fields are optional. You can map data from your table to standard or custom properties (e.g., Company Name, Description, Industry, Type, Lifecycle Stage).
Output Fields
- ID: Unique identifier of the created record.
- Archived: Indicates if the record is archived (e.g., true or false).
- Created At: Timestamp when the record was created.
- Updated At: Timestamp of the most recent update to the record.
- Properties: Contains default attributes (e.g., lifecycle stage, pipeline, source) and custom fields mapped during creation.
Action Lookup Object
Lookup a record using one or multiple field criteria. Can return multiple records if matches are found.
Action Walkthrough
To lookup an Object:
Step 1: Select the Hubspot account you want to use.
Step 2: Specify the Object you want to lookup
Step 3: Define search parameters.
- Fields to Filter By: Select the fields you want to filter by (e.g., “First Name” or “Email”). These fields will be used as criteria for narrowing down results.
- Search Operator (Optional): Specify whether the search should use AND or OR logic to combine multiple filters.
- Field Values: Enter the specific values to search for in the selected fields (e.g., “First Name = John” or “Email = john@example.com”).
Step 4: Configure response settings.
- Remove Blank Values from Results: Set to true to exclude blank values from returned objects, reducing response size.
- Limit: Set the maximum number of objects to return (defaults to 10 if left blank).
Step 5: Configure run settings.
By default, new rows in your Clay table trigger this action. Learn more about auto-update in this guide.
To run only under specific conditions, use formulas that trigger the action when true. Learn more here.
Step 6: Run the action to lookup your record(s).
Input Fields
- Object Type: Select the object to lookup (e.g., Contact, Account)
- Field(s) to filter by: Specify the field(s) to search within the object.
- Search Operator: Choose how multiple fields are matched.
ANDrequires all fields to match.ORrequires at least one field to match. - Filter Field Input(s): Specify the string to search for within your filter fields.
- Remove Blank Values from Results: If set to true, blank values will be removed from the returned objects, reducing the response size.
- Limit: Specifies the maximum number of objects to return. Defaults to 10 if left blank.
Output Fields
- Results: An array of matching records, each indexed (e.g., 0, 1, 2, etc.). Useful for handling multiple returned results.
- Total Found: The total number of records that matched the lookup criteria.
For each result returned:
- Object ID: Unique identifier of the record.
- Archived: Indicates if the record is archived (true or false).
- Created At: Timestamp when the record was created.
- Updated At: Timestamp of the most recent update to the record.
- Properties: Contains filled default and custom fields for the searched record.
Action Update Object
Update the Company information based the Hubspot Object ID as a unique identifier. If you do not have the Hubspot Object ID, you can use the Lookup Object action.
Action Walkthrough
To update your object:
Step 1: Select the Hubspot account you want to use.
Step 2: Specify Object Type to update within Hubspot.
Step 3: Enter the HubSpot Object ID to look up the object.
Optional Step: Configure Ignore Blank Values:
- True: Blank values from Clay are ignored and do not overwrite existing values in HubSpot.
- False: Blank values from Clay are sent to HubSpot, overwriting existing values with blanks.
Step 4: Map fields for the records you want to update.
Match fields from your Clay table to the corresponding HubSpot properties, ensuring data types and formats align.
Tip: You can use the Show only mapped fields option to navigate the fields within the enrichment panel.
Step 5: Configure run settings.
By default, new rows within your Clay table will automatically update or create a company within Hubspot. Learn more about auto-update in this brief guide.
To run enrichment only under specific conditions, use formulas that trigger the column when the formula is true. Learn more about AI formulas in this Clay University lesson.
Step 6: Run the enrichment to update the specified records.
Input Fields
- Object: Select the type of object you want to update (e.g., Company, Contact, Deal, or Custom Object). After selection, Clay automatically displays the available fields for that object.
- Hubspot Object ID: Enter the ID of the record to retrieve and update.
- Object Fields: Note all fields are optional. You can map data from your table to standard or custom properties (e.g., Company Name, Description, Industry, Type, Lifecycle Stage).
- Remove Blank Values: If toggled on, blank values will be excluded from updates to avoid overwriting existing data.
Output Fields
- ID: The unique identifier of the created record.
- Archived: Specifies if the record is archived (true or false).
- Created At: The timestamp when the record was initially created.
- Updated At: The timestamp of the most recent update to the record.
- Properties: Includes default attributes like lifecycle stage, pipeline, and source, as well as any custom fields mapped during creation.
Action Create association
Create an association between two objects in Hubspot.
Action Walkthrough
Step 1: Select the Hubspot account you want to use.
Step 2: Specify the From Object Type and To Object Type.
Choose the types of objects you want to associate. The From Object Type represents the source object initiating the association, and the To Object Type represents the target object to be linked.
Example: If you are associating two contacts, both From Object Type and To Object Type would be set to Contact.
Step 3: Select the Association Type.
Define the relationship between the source and target objects.
Step 4: Enter the From Object ID and To Object ID
Provide the unique identifiers for the From Object ID and To Object ID. These are typically fetched dynamically from previous workflow steps.
Step 5: Configure run settings.
By default, new rows within your Clay table will run this action. Learn more about auto-update in this brief guide.
To run enrichment only under specific conditions, use formulas that trigger the column when the formula is true. Learn more about AI formulas in this Clay University lesson.
Step 6: Run the enrichment to create an association between two objects.
Input Fields
- From Object Type: Select the type of object you want to associate from (e.g., Company, Contact).
- To Object Type: Select the type of object you want to associate to (e.g., Deal, Ticket).
- Association Type: Choose the type of association (e.g., “Deal with Primary Company”). Leave blank to use the default association type.
- From Object ID: Specify the unique ID of the “From” object to establish the association.
- To Object ID: Specify the unique ID of the “To” object to establish the association.
Output Fields
- Labels: An array containing tags with for the association. (Ex. Contractor)
- To Object Id: A unique numeric identifier for the target (destination) object of the association. This field represents the object to which the relationship is linked.
- From Object Id: A unique numeric identifier for the source (initiating) object of the association. This field represents the object creating the relationship.
- To Object Type Id: A string or numeric identifier specifying the type or classification of the target object in the association.
- From Object Type Id: A string or numeric identifier specifying the type or classification of the source object in the association.
Action Retrieve associated objects
Retrieve associations between two objects in Hubspot.
Action Walkthrough
Step 1: Select the Hubspot account you want to use.
Step 2: Select the From Object Type and To Object Type.
Choose the type of source object you want to look up associations from and the type of target object you want to retrieve associations for.
Example: If you want to find companies associated with a contact, From Object Type would be Contact, and To Object Type would be Company.
Step 3: Enter the From Object ID.
Provide the unique identifier of the source object (e.g., Contact ID) to look up its associated target objects.
Step 4: Configure run settings.
By default, new rows within your Clay table will run this action. Learn more about auto-update in this brief guide.
To run enrichment only under specific conditions, use formulas that trigger the column when the formula is true. Learn more about AI formulas in this Clay University lesson.
Step 5: Run the enrichment to retrieve associated objects.
Input Fields
- From Object Type: Select the type of object you want to associate from (e.g., Company, Contact).
- To Object Type: Select the type of object you want to associate to (e.g., Deal, Ticket).
- From Object ID: The unique ID of the source object for association lookup.
Output Fields
- Results: An array containing the matching records. Each record is represented by an indexed object (e.g., 0, 1, 2, etc.). This structure allows for handling multiple results in a single response.
- Total Found: Indicates the total number of records that matched the search criteria.
For each result returned:
- Id: A unique identifier for the record, represented as a numeric string.
- Archived: A boolean field indicating if the record is archived. Possible values are true or false.
- Created At: The timestamp indicating when the record was initially created.
- Updated At: The timestamp showing the most recent update made to the record.
- Properties: A nested object containing both default and custom fields for the specific record with the association.


